
I really like the idea of using a guitar as a platform for artistic expression – the idea of a tool for artistic expression (music) being itself an artistic expression. In the 1990s, NYC street artist John ‘Crash’ Matos painted several guitars for Eric Clapton. Eventually Fender got involved and some 50 various “crashocasters” were built and sold by Fender, the artwork coming from Matos.
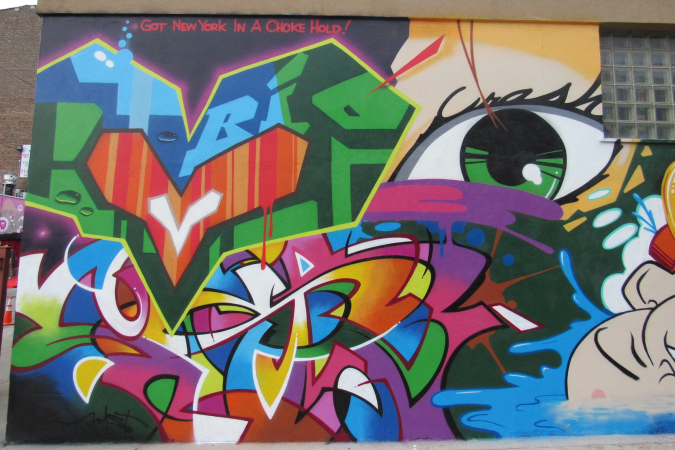
Matos’ art was extremely colorful and very arresting. Here is one mural of his which I like a lot.
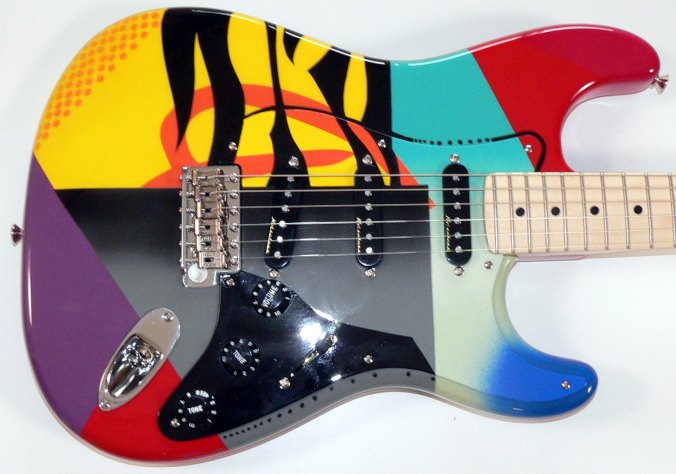
And this is the first “Crashocaster” that he painted.
I thought it would be fun to build a guitar using the crashocaster as inspiration – bright colors and full of life – and indeed I did a bunch of mockups but alas, I am no artist. I would include a couple images here but they really are lame and so what would be the point?
Now let’s travel through space-time to this spring and to Italy. On the wall of the Church of Sant’Antonio Abate, in Pisa, lies the last public work painted by NYC artist Keith Haring. It’s a large mural, two stories at least, painted in 1989, and entitled Tuttomondo.
Here is Tuttomondo.
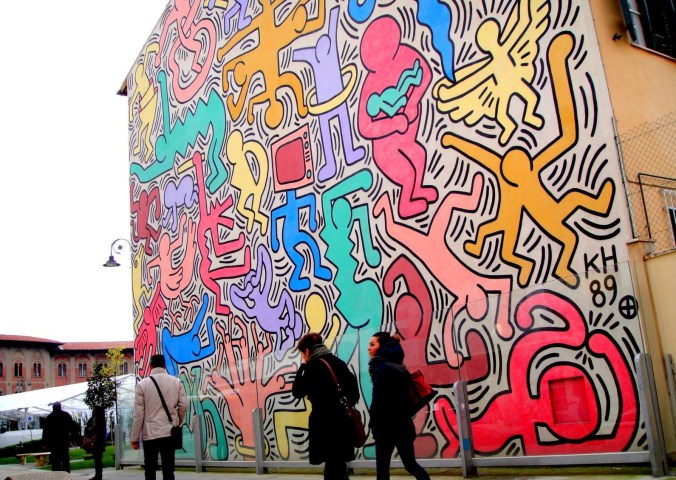
Keith Haring’s pop art derived from the NYC street scene of the early 80s. Like John Matos, his art was also characterized by bold, vivid colors, and active figures living life. Tuttomondo was dedicated to universal peace and, sadly, Keith Haring died of AIDS shortly after painting Tuttomondo, on February 16th 1990.
My daughter is very interested in graphic design and art, and she is a fan of Keith Haring (which is how I learned of him) and we decided to collaborate on a guitar project.
We decided to build the Tuttomondo guitar! When we started, I had no idea how this project was going to work out nor how we would end up getting the image onto the guitar body but I knew that before anything else, we needed to get our own version of the image from which to work. So the first item of business was for my daughter to reproduce, by hand, the Tuttomondo mural from a snapshot. Here is an early screenshot of the effort as she was beginning.

Meanwhile, it was time to get a guitar body ready. I bought an unfinished, chambered (for lightness) Telecaster body, primed it, and painted it white.

Like the last couple guitars I built, this guitar will have no pickguard and no pickup selector switch, the better to see the image on the front. The knob normally used for the tone adjustment will be used to provide an infinitely variable selection between neck and bridge pickup. So the only controls on the guitar will be two knobs.

Having finished drawing the image, my daughter had started mocking it up on a computer and overlaying it on a guitar outline, when she realized some of the figures she wanted to appear on the guitar wouldn’t fit given the image’s existing structure. To include those figures, she inverted the image, so it was as though one were looking at it from the other side, outwards from within the page. Here is the final inverted image she created:

And here is her final electronic mockup.

The next challenge was how to get this electronic image onto the guitar body. Neither of us have ever painted fine details on a guitar and I was doubtful that we could reproduce this by hand, on our first attempt. I started scouring YouTube where I found all kinds of videos about transferring printed images using ModPodge. The thing is, none of the transferred images had the kind of color brightness we were seeking. They all looked faint and faded and in fact that whole direction just seemed ad hoc and bush league. So we abandoned that path.
Then I thought about trying to use a flatbed printer to print the image on the guitar. A flatbed printer is a printer in which the printer head moves around, over top of a flat bed where the item being printed remains stationary. After tons of searching I found Alphagraphics, a local company with a giant flatbed printer who agreed to try to print the image onto my guitar body. We sent them off a 450 DPI PDF and presto! Alejandro and his boys delivered!
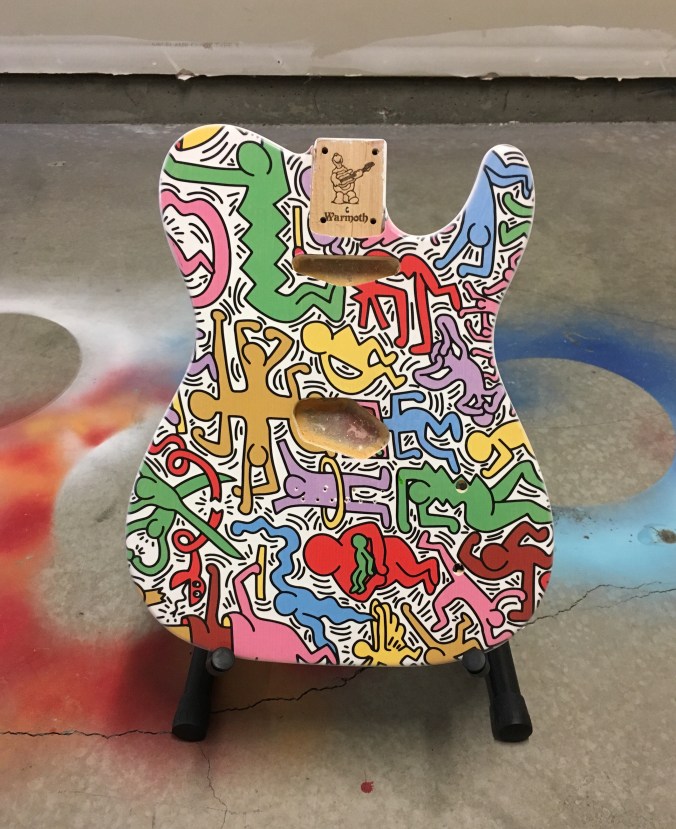
And here is the raw result just back from the print shop:

The next step before assembly is to get a glossy hard shell coating on the guitar, to protect the image. Doing a glossy shell requires putting down coats of clear followed by a lot of wet sanding and buffing, with increasingly fine grit sand paper to polish the finish to a mirror shine. Spraying clear in one’s garage is challenging and potentially dangerous, depending on the choice of lacquer. Worried that this was beyond my level of skill or experience, that I might accidentally sand through the clear into the image, and that I might mess up what was turning out to be an excellent project, I started shopping around for actual craftsmen who could help me. Interestingly, it is even more difficult to find someone who will do fine finishing work than it is to find a print shop who would print on my guitar!
Eventually I found a luthier who told me that while he was booked for over a year doing finishing work(!) and he was declining all new work, he would refer me to Daneen, owner and artist at customairbrush.com. He told me she was the best in the business and that he now sends some of his work to her. So I asked Daneen about cleaning up and clear coating the body and she agreed to do it for a very reasonable price.
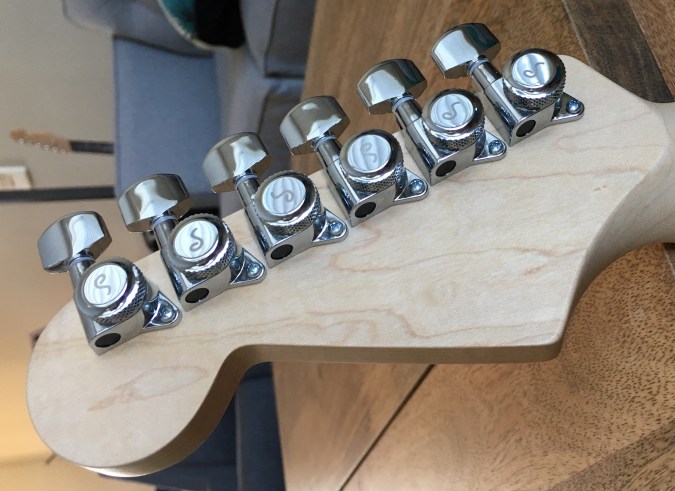
With this guitar, the mural will be the centerpiece and so other components are chosen to perform in a subordinate role. The pickups are standard Telecaster style pickups, noiseless versions from Seymour Duncan. There will be no pickguard. And the neck is plain ole quartersawn maple. So while the guitar was being finished, I installed the tuning machines on the neck. As usual, only Schaller locking tuners are used, the product of fine German engineering 🙂

When I picked up the finished body, I was totally blown away. Daneen had re-sprayed the back of the guitar to clean up some of the blemishes left by the printing process, had evened the transition between white and mural along the edges, and had given it a glossy hard shell. It’s a very high quality job.

Then it was my turn to contribute to the project – time for me to do the final assembly and set up 🙂
First things first – the wiring. I’ve learned the hard way to test this particular phase at every step. Even before putting on the bridge, one can plug in the amp and bang a screwdriver on the pickups, verifying the pickups and controls work as expected. You can see the wiring diagram I used for this guitar on its specification page. Red and white wires from the pickups are soldered together and taped off and the green and bare wires are soldered together. Unintuitively, the black wires from the pickups are the signal-bearing leads.

After the wiring is done, on goes the bridge, the neck, the strings, and a full setup, which includes truss rod adjustment, intonation, string height, pickup height, and tuning. Some close-up sneak peaks:

I’ve heard people say that when they see a neck plate gasket, they immediately think ‘partscaster’ but I don’t agree. If you tighten the screws, a neck plate will mar the finish and if you want to avoid that, a gasket is a simple way to protect the finish. I also like to use Fender neck plates – I don’t know why – it’s probably because Fender was the inspiration for so much of the guitar world and my builds specifically. This is a nod to them.

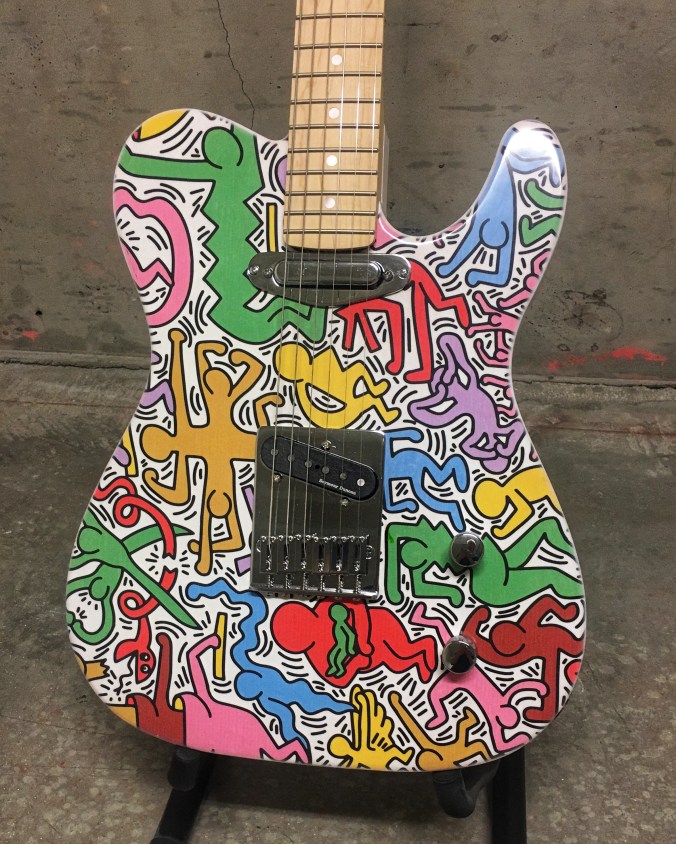
And here is the finished Tuttomondo guitar.


Update 2021:
I eventually decided the neck looked odd with white inlay and so I replaced the neck with a more traditional looking maple neck.


Ciao.
Categories: music
Tags: airbrush, crashocaster, flat bed printer, graffiti art, john matos, keith haring, pisa, tuttomondo

Nice work Pat and Rae! Especially Rae’s drawing!
LikeLike